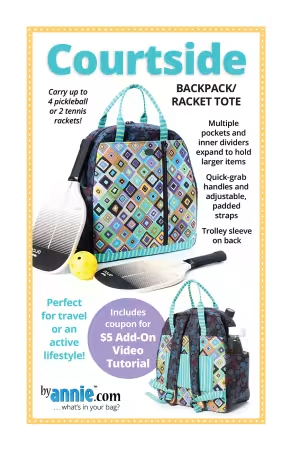
Courtside
# PBA303


(0)
From ByAnnie
By Unrein, Annie
In Bags, Purses, Totes & Electronic Covers
DESCRIPTION
Hit the courts in style with this backpack designed to carry rackets, balls, gear, and more. It’s perfect for anyone who travels or has an active lifestyle.
You’ll love its large easily-accessible interior. Slip and zippered pockets plus expanding dividers organize everything from personal needs to water bottles. Carry with quick-grab handles or use the adjustable padded straps to carry as a backpack. A trolley sleeve on back makes travel extra easy!
NOTE: This project has many pieces and multiple layers so is recommended for intermediate to advanced sewists using a sewing machine that can handle bulk.
Finished size:
15in H x 11in W x 4-3/4in D at top,
15in H x 14-1/2in W x7-1/4in D at bottom
CLASS INFO:
Courtside is an involved project that makes a great class for intermediate to advanced sewists. Students need a machine that can handle bulk, so it won't be appropriate for many small take-to-class machines.
If you are a machine dealer, use this project to demonstrate how well your machine handles the layers. (Be sure to watch the Add-on Video for tips!)
We'd suggest a series of four half-day classes for this project. Plan to demo each step in each class so that what isn't finished during class can be assigned as homework to finish before the next class.
In the first class, students can complete steps II and III of the pattern to prepare the zippers, bias binding, fuse interfacings, prepare handles, straps and tabs.
In the second class, students will complete step IV to prepare all the pockets for the project.
In the third class, students will complete step V. Prepare Inner Divider, step VI. Prepare Zipper Loop, and steps VII. Prepare Body Front and VIII. Prepare Body Back.
In the fourth and final class, students will complete step IX to assemble the organizer and bind the raw edges.
IMPORTANT:
We recommend that students read the pattern and watch the Add-on Videos before coming to class. To make best use of class time, we also recommend that they come to class with everything cut out and labeled for their project and that they complete the basic steps to cut and quilt the fabrics for the project.
So, they should complete all of step I. Cut and Quilt on pages 2 and 3 BEFORE coming to class.
Add-on Video notice: There is an Add-on Video available for this pattern. The Add-on Video is specially designed to support specific parts of the pattern and help the customer learn our best techniques. It doesn't replace the pattern -- it will enhance their sewing experience.
To support local quilt shops, related paper patterns include a coupon for the value of the Add-on Video. This is a $5.00 value. Customers can then use the coupon to get the video for free on the ByAnnie.com website.
Not in Chains
Made in USA
$14.95

You're shopping stores near
00000
Change my location.
STORES NEAR YOU


Locating Stores Close To You
Please Wait.
SUGGESTED ITEMS
Finding Suggested Products.
Please wait.
Please wait.


